This error is caused when the proxy or the firewall settings are configured incorrectly. This results in the client’s connection to the Windows Update servers failing.
How to fix Windows Update Error Code 0x8024402c
If you receive this error code 0x8024402c, here are two things you could try: If you tend to create a System Restore point usually, you can try to undo any sorts of intentional or unintentional modifications on your computer; you can try to perform a System Restore from that System Restore point. And in case, you do not have any habit to create and maintain a System Restore point; you can also start doing so because it is a very strong feature that will let you fix your computer in a number of scenarios.
1] Fix the Proxy Settings
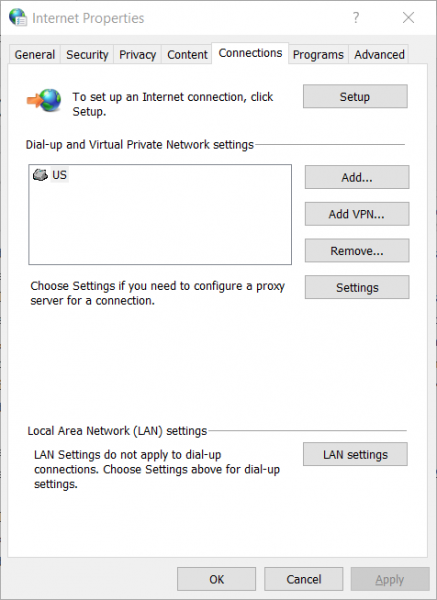
Search for Internet Explorer in the Cortana Search box and select the appropriate entry. Now, hit the WINKEY + T button combination on your keyboard and click on Internet Options. Navigate to the tab named Connections.
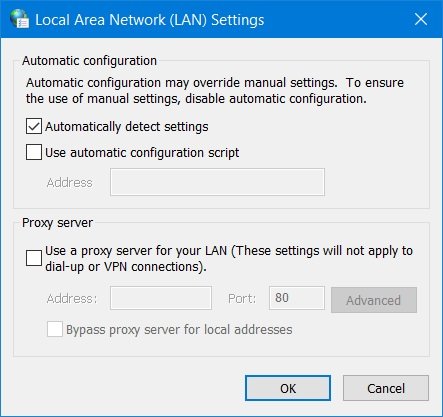
Click on LAN Settings.
Then click on Advanced. Delete all the entries in the list generated in the section called Exceptions. In case the Advanced button is disabled because of the checkbox labeled as Use a proxy server for your LAN (These settings will not apply to the dial-up or VPN connections) is disabled, you are good to go and jump to the next step. Then start by pressing WIN+X keys or right-click on the Start button and click on Command Prompt (Admin) or just search for cmd in the Cortana search box, right click on the Command Prompt icon and click on Run as Administrator. Click on Yes for the UAC or User Account Control prompt that you get. Now type in the following commands one by one and then hit Enter after each one of them. Reboot your computer and then try to check for updates again.
2] Set up Automatically Detect the connection settings
Start by typing in Internet Options in the Cortana Search Box. Click on the appropriate result.
Now navigate to the tab called Connections. Under the section labeled as Local Area Network (LAN) settings. Click on the button that says LAN Settings.
Under the section of Proxy Server, uncheck the option that is labeled as Use a proxy server for your LAN (These settings will not apply to dial-up or VPN connections). Click on OK and then Reboot the computer for the changes to take effect. Now check if your issue is fixed or not. Hope this works for you!


